Saturday, August 30, 2008

Quick View Of Traffic Using Windump

Issue:
Get a view of network traffic using free, easy to install, Windump utility. Also how to check for arp happy malware.

Quick:
Download winpcap and windump from winpcap.org. Run winpcap.exe from a command-line.

Visual/Learning:
WinDump is the Windows version of the Unix tcpdump utility. Like many Unix tools this is a command-line utility, so no fancy graphics, but not that hard to use either.


Download WinPcap utility from http://www.winpcap.org/install/default.htm
Download the WinDump utility from http://www.winpcap.org/windump/install/default.htm


Install the WinPcap utility onto you computer. You will see the Setup screen, Welcome screen, License screen, Install screen, and Finished Screen.


Next I copied the WinDump.exe file to the C:\Utils directory. I open a command prompt, go to that directory and run windump. By default WinDump tries to use the first adapter it sees which in my case is the DialupAdapter.

I use the "windump -D" command to see all the adapters. The network card is the one I want and I see it listed here as number 2 in the list.
Now "windump -n -i 2 -c 10" gives me output from my network card. (-n) means no name lookup, (-i 2) means use the second adapter which is the network card, (-c 10) means only capture 10 packets.
I can enter a string to filter on. Here I am filtering on packets that have the string arp. All you have to do is type the string at the end of the command line.

Here is the same command except I am going to (-c 10) get the first 10 packets that have the string arp, (-t) remove the time stamp, and () pipe it to the sort command and sort it starting with the (/+30) 30th character. Unix has better tools for this but I am trying to sort by the second IP address so that I can see who is sending the arp requests. Machines that send a lot of arp request may be infected with malware. See this link for a discussion about that.
Here is a manual for the various switches you can use with WinDump http://www.winpcap.org/windump/docs/manual.htm


Friday, August 29, 2008

Outlook Forms 13 - Completed Check Request Form

Issue: Screen shots of the completed check request form.

Quick/Visual/Learning:
This is the form that the user sends to the manager:


This is the form the manager receives. Notice I have added a picture box that shows the approving manager where the buttons are for approval.

Here is what the requester and finance department gets when the manager approves the check. Notice that finance has a button that allows them to respond, "Finance Response" button in the upper left corner. Here is what the finance response looks like, check cut date and any notes:

Here is what the manager response looks like if the check is Not-Approved. This response goes only to the requester and is not seen by finance. Just has place to explain why it was rejected.
If you do not see your reply buttons on the tool bar check the properties of the Approve and Disapprove actions on the Actions page of the form. The show action box should be checked and the Menu and Tool bar option should be selected.

Go To Outlook Forms 14
Go to Outlook Forms Index

Outlook Forms 12 - Access Forms & Folders With Website Link

Issue:
Want to be able to link to Outlook Forms and Folders using internal intranet website.

Quick:
JavaScript to access Exchange server organizational forms library. Client machine needs local outlook profile pointing to the Exchange server in order to open the forms. Link to folders like outlook://Public%20Folders/All%20Public%20Folders/Administration/CompanyCalendar

Visual/Learning:
Found good information on how to do this at: http://www.outlookcode.com/d/code/formonweb.htm
Be aware that you may need to lower browser security for the Local Intranet zone.

First get the Message Class Id for your form.
In Outlook the normal way you would get to a form is by going to the Tools menu, selecting Forms, and selecting "Choose Form..."


In the "Choose Form" window under "Look In:" select "Organization Forms Library" and select the form CheckRequest. By clicking Open you could launch the form and fill it out. In this case I just want to know the message class, so click on the "Details" button and you can see the message class at the bottom of the window.


With the message class information I can modify the java script found on the aforementioned website to access my form.

Here is what the first part of the script looks like. Just sets up variables and the function to open the form.


The next part of the script I have highlighted in yellow the parts I changed to launch 3 company forms using buttons, or to launch the same 3 forms using a web link. This jpg may be hard to see. I tried just entering the text here but each time I did the blog site just tried to interpret the code. The part that gets changed is the Title of the form that you see on the internal website and the message class that gets passed to the function we saw above for opening the form.


When I open the web page in my browser I can now see three buttons and three links for my 3 company forms.


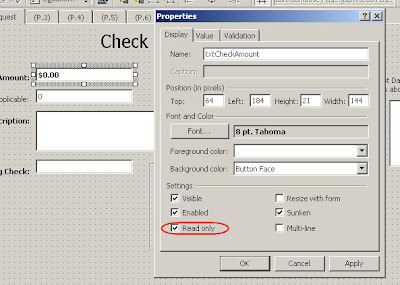
When I click on one of these links I get a warning:


I click yes, and now my form opens so I can fill it out and hit the send button.


While I am on the topic of accessing Exchange information from an internal website, I will mention getting to public folders.
Here is a link to get to our shared company calendar in the public folders.
outlook://Public%20Folders/All%20Public%20Folders/Administration/CompanyCalendar
The calendar is under Administration, which is under "All Public Folders", which is under "Public Folders"
%20 in this link represents a space character.
You can use a link this to access pretty much any public folder.

Thursday, August 28, 2008

Outlook Forms 11 - Data Verification

Issue:
Insure that all required fields have been filled out.

Quick:
Set validation formulas for fields on Validation tab of Properties page.

Visual/Learning:
The quick way to do this is to open the properties for a field, go to the Validation tab and select the check box "A value is required for this field"


The down side of doing it this way is that the error message you get is pretty vague. All I get for an error is that "A field on this form requires a value". So the poor person filling out the form has to guess which field on the form is missing required data.


A better way to do this is to use formulas to check my fields and assign error messages that are more friendly to work with. The formulas will change a bit depending on what kind of data I am checking.

To do this I need to know the name of the field I want to work with and what it is. I am going to work with the text field Payee so I right click on the field go to properties select the Value tab and I see that "Payee" is the name of the field value. Makes sense, so now I go to the Validation tab.


Here I check the box for "Validate this field before closing the form" and I put in the formula box "Asc(Payee)>0". All text is represented to the computer as a number code. The code comes from the American Standard Code for Information Interchange or ASCII for short. In the formula Asc is even a shorter version of ASCII. I look for the ASCII code for the text in the payee text box. As long as that box is not empty it should have an ASCII code of more then zero. That is why my formula tests to see if the ASCII code for the contents of the Payee field is greater then zero. Now the great thing is if it is not greater then zero I get to write my own error message. In this case I put "You must enter a name for the Payee". Now when someone tries to send this form with out filling in the Payee field they get a message that tells them exactly what needs to be fixed. This trick should work with pretty much any text field.


For radial buttons the same trick works because when I click on the button it assigns a text value to the field. First get the name of the field.


Check if the ASCII code for that field is greater then zero, and specify an error message.

The one thing of note here is that when you set validation on one radial button all the radial buttons in that group get the same setting, so you do not have to do it on each individual button.

The check amount is a number field and the default value gets set to zero. Because it does not make sense to request a check for zero dollars I will check that the value of CheckAmount is not equal to zero. <> in the formula means not equal.

That is pretty much all we need for this form because we are only checking for text and number fields in this form. But if you need to check a date field this is how I have done it in the past.

This formula is from a New Hire form I created. The default date field shows "none" when you run an Outlook form, but the computer really sees that as some date in the distant past. Now() is a function that gives me todays date. A formula like Now()<[StartDate] would check that the date entered was after today. So tomorrow, next week, or next year would be fine. A start date of today's date, yesterday or any older date would generate an error because today is not an earlier or smaller date then the start date.

In the case of the example below I am checking for Now() minus 10 days. In theory New Hire forms should be filled out before people start work, but in reality that is not always the case. This formula gave people a few days to get in the New Hire form after the employee starting working with no error, but it would still give an error if they forgot to put anything for a date.


Go To Outlook Forms 12

Go to Outlook Forms Index

Wednesday, August 27, 2008

Outlook Forms 10 - Installing Forms On Exchange

Issue:
Install forms so that they are available to all the company employees.

Quick:
Hide reply forms Properties tab, check box "Use Form only for responses"
Install forms in the reverse order in which they are used - Tools, Forms, Publish Form. Create new actions on Actions tab for using reply forms.

Visual/Learning:
T0 setup custom reply actions for a form, the reply forms have to already be installed. So I install the forms in reverse order.

Open up each of the 3 reply froms. On the (Properties) tab of the form select the check box "Use form only for responses". This check box will hide the form in the library.


This box should be checked on all three of the response forms.

On the "Check Request" form this box is not checked because this is the one that will get selected from the library to start off the process.

After this box is checked on the "Check Request Not-Approved" and "Check Request Finance Response" forms, I can install these two forms on the Exchange server.

Open the "Check Request Not-Approved" form.
On the Tools menu select Forms, "Publish Form".


In the drop down box select "Organization Forms Library".
Note here that you can only install forms in the "Organization Forms Library" if you have permissions to do so.

Give the form a name such as CheckNotApproved, and click Publish


Do the same thing for with the "Check Request Finance Response" form

The other two forms require actions to be added so that they will call these response forms.

Open the "Check Request Approved" form. When the Finance department gets this form they will need to respond with the "Check Request Finance Response Form". To make this work I will create a custom action on the (Actions) tab.

Click on the New button on the bottom left. This will bring up a "Form Action Properties" box. Give the action a name in this case "Finance Response". Click on the "Forms name" drop down and select "Forms...". This will bring up another "Chose Form" window.

In this new window select "Organization Forms Library". Because I have already installed the reply form, I now see CheckReqFinanceResp in the list. Select this form and click on open. This takes me back to the "Form Action Properties" window and the "Form name" box has the form I picked. Now select the "Address form like a" area and pick "Reply to All" from the drop down box. I select this because I want everyone involved to know that the process is complete (Manager, Requester, and the other Finance person). I also select to "open the form" so that information from Finance can be entered on the form before sending.
Click OK on this page and then publish this reply form to the Organization Library just as I did with the previous 2 reply forms.

Now I am ready to configure and install the main "Check Request" form.

Open the form and under (Actions) tab create two new actions. Here you can see I have already created the new actions of "Approved" and "Not-Approved".
Below are the setting from the Approved action. This will open the CheckApproved form from the Organiztional Forms library. This form is set to Reply. This form will go back to the requester becuase of this Reply setting. This form will also go to Finance because several steps back on the "Check Request Reply" form, I set the CC field to automatically populate with the "Finance Check Approval" email group.
Lastly this action is set to "prompt the user to open or send". I could also set this to "Send the form immediatly" since there no input required by the manager on this form.


For the "Not-Approved" action I again select the form from the organization library and configure it to address the message like a "Reply". In this case the message will only go back to the requester because I did not automatically populate any of the email address fields on the "Check Request Not-Approved" form. Here I set the action to "Open the form" so that the manager has a chance to enter information about why the request was rejected.

At this point I should have a completely working process.

Go To Outlook Forms 11

Go to Outlook Forms Index

Tuesday, August 26, 2008

Outlook Forms 9 - Read and Reply Forms

Issue:
Give Outlook form reader extra or different information that was not on the form when it was sent. Providing forms for responding to, and routing information.

Quick:
Change form read layout - menu, Separate Read Layout, Save copy of files as .oft to be used for creating reply forms, install on the server, create custom actions on the original form to use reply forms.

Visual/Learning:
It is time to think about reply forms. Here is what the running form currently looks like.

There are 3 situations where a reply is required. 1. Manager rejects request, 2. Manager approves request, 3. Finance confirms check cut date.

1 and 2 both come from the manager so I could use a single reply form that just had a control to accept or reject the request. On the other hand I would like to route the rejected request just back to the requester, while accepted requests need to go to the finance department as well. I am thinking I want to pre-address these messages so they go to the right places automatically and the quick and dirty way to do this is to use two separate reply forms.

I also need a 3rd reply form for responses from the finance department.

There is no need to start reply forms from scratch. My current form already has all the right fields in it so just do a Save As and create 3 separate copies of our current form to be modified later.

Before working on the reply forms I want to modify what the receiver sees when he gets a form from the requester. One Outlook form can have two separate layouts. One layout for composing the message and a completely different one for reading the message. This is very useful in this case because I would like to put one set of instructions on the compose page for the person filling out the form, and another set of instructions on the read page for the person responding to the form.

To separate out the read page go to the Form menu and select "Separate Read Layout".


Now go to the Form menu again and select "Edit Read Page"

On the read page you see that it starts off as being a copy of what is on the compose page. Below you can see I have changed the Read page by changing the title from "Check Request" to "Check Request Approval". I have also put some instructions in regarding what the person needs to do in order to Approve or Not-Approve the request, and I have deleted the instructions from the read form that were only for the requester to use.

I will also change the data fields to be read only so that the information that came from the requester is locked in. Go to the properties page on each field and check the box for "Read Only"


Now all the fields show as grayed out and their contents will be unchangeable on the read page.


Re-save this form as and OFT file and work on one of the reply forms. Here I have the OFT form that will be used for approved check requests. The title has been changed and all the instructions have been removed. Also all of the data fields have been set to "Read Only".


On the (Message) tab I am going to set the Subject properties under the value tab to be automatically set as "Check Request Approved". Even though the Message page is hidden the Subject will still show up on the form in the Outlook inbox.


I am also going to set the CC field to automatically populate with "Finance Check Approval". This is the name of an Exchange server email group containing the 2 people in finance that will need to see these messages. Now these people will automatically get these messages regarding approved check requests. I could have also addressed this message to individual people but in this case I am using a group. The nice thing about using a group is that you can change where the form goes to by changing the group membership and without having to make changes to the form.


OK Save the Approval form and open the Not-Approved form.

Again I change the tile of the Form and I added a box for comments so that the manager can say why this request was rejected.


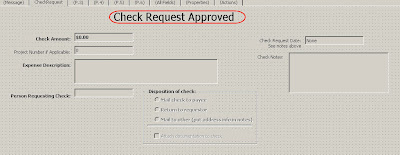
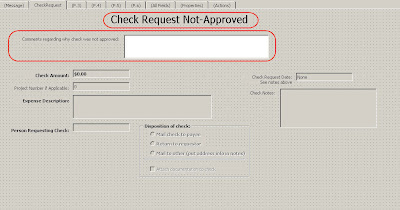
On the (Message) tab I am going to change the subject to "Check Request Not-Approved" but I am not going to send this message to any additional people.


Save the Not-Approved form edit the last reply form, which is the response form from Finance. Here I changed the title to "Check Request Finance Notification"

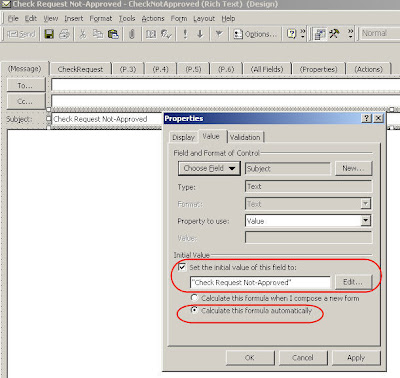
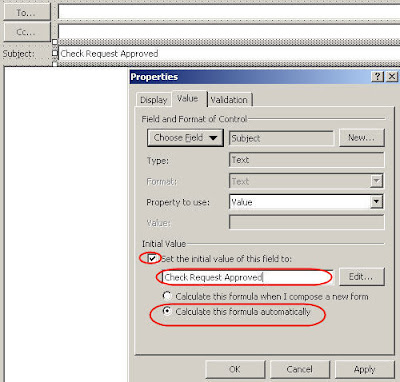
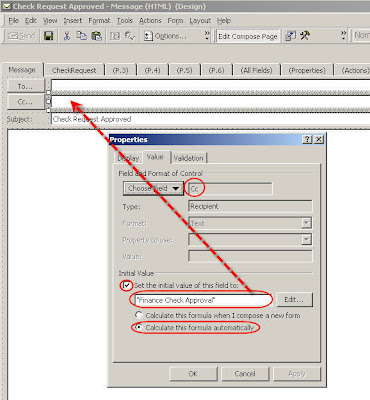
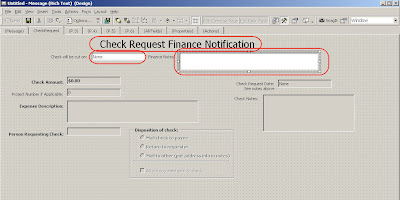
And set the subject line to "Check Request Finance Notification"
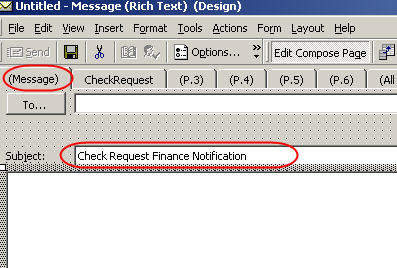

Go To Outlook Forms 10

Go to Outlook Forms Index