Thursday, July 31, 2008

Excel change columns to rows, or rows to columns

Issue:
While working in Excel you realize that you wish the data was oriented differently in your spreadsheet.

Quick:
Select data, copy, select empty area, paste special, check transpose box.

Visual:


Learning:
Once you realize that your data is not in the best orientation you might be tempted to start over or to copy your data cell by cell to the right orientation. Hold everything, there is a better way. Using the Transpose feature in Excel you can switch around your column and row data with a few clicks of the mouse. In the example only one row of data is being transposed to a column but you can also select an entire block of data and transpose will switch all the selected rows and columns at once.

-Select a row, column, or block of data to transpose.
-Right click the selected cells and select paste special from the menu
-Right click an empty section of the spreadsheet and select Paste Special from the popup menu
-On the Paste Special menu check the box for Transpose-Click OK

Wednesday, July 30, 2008

Mail Bounces Using Outlook AutoComplete Address

Issue:

Outlook AutoComplete gives the wrong email address


Quick:

When autocomplete pops up the address select it and press the delete key


Visual:


]


Learning:
Outlook 2003 and later, remembers what email addresses were previously entered either manually, from a contact list, or from a company mail server. As Outlook learns these addresses it will start to try and guess the correct email address as you are typing in an address field. This feature is called AutoComplete. This can help you speedup the sending of email messages since you only have to type in a few letters of the email address and then pick the right one from the suggested list. However, these saved email address that are used by AutoComplete are stored on your local computer (cached). The problem is that AutoComplete does not update its information if an address changes (even if the correct information is on a local Exchange email server). What you need to do is to delete the bad saved address entry manually:

-Start typing the name or address
-When the entry pops up select it
-Use the Delete key on the keyboard to delete it
Now the old saved information is gone and Outlook will learn the new address.

Monday, July 28, 2008

Outlook Does Not See Active Directory Changes

Issue:
Changes to Active Directory are not showing up on Outlook 2003

Quick:
In Exchange 2003 server run Offline Address Lists – Rebuild, On client machines download the address book.

Visual:

Exchange Server


Outlook Client


Learning:

After adding some phone numbers in Active Directory we saw that these updates were not showing up in Outlook. If Outlook is running in cached mode it saves and uses a local copy of the Offline Global Address List. The Offline list usually gets updated once a day, which is OK in most cases. But in order to get updates right away you have to update this list and then download the address list on the client machine.

Exchange Side
-Open the Exchange System Manager
-Under “Offline Address Lists” select “Default Offline Address List”
-Right click and select Rebuild

Outlook Client
-Select Tools
-Select Send/Receive
-Select “Download Address Book”
-Uncheck box “Download changes since last Send/Receive”
-Make sure “Full Details” is selected
-Choose “Global Address List”-Click OK

Wednesday, July 23, 2008

Microsoft Word Crashs On Starting

Issue:
When trying to open Word you get the error "Microsoft Word has encountered a problem and needs to close" and you get an option to open Word in safe mode.

Quick:
In c: / Documents and settings / Userid / Application Data / Microsoft / Templates - rename the normal.dot file

Visual / Learning:
Note that this can also cause a problem for Outlook if you are using Word as your email editor.
Here is a very good link from http://www.officearticles.com/ that talks about the normal.dot file
----- Here Is The Text From The Link -----
About Normal.dot in Microsoft Word
Understanding normal.dot is important if you're an avid user of Word. Normal.dot (endearingly referred to as Normal Dot Dot) is the default or global template that Word uses to create a blank document. Normal.dot is always in use when Word is open, even if you are using another template. Normal.dot files commonly become corrupt. They also store macro viruses, though email viruses are much more popular than Word viruses ever were, and it's hardly an issue anymore.

Some Facts About Normal.dot
- When you launch Word, it looks for normal.dot and opens it. If your normal.dot is corrupt, it can cause Word to crash upon launching.
- If Word cannot locate a normal.dot file, it creates a brand new one.
- When you first install Word, normal.dot is not installed. Hence, uninstalling does not delete normal.dot.


These facts explain why reinstalling Office or Word does not fix a problem with a corrupt or virus-infected normal.dot file. Your newly installed Word application finds normal.dot right where it was before.

Location of Normal.dot
The location of the normal.dot file that Word is looking for can be found by opening Word, and using ToolsàOptions, File locations tab. Choose User templates. The location is in the lower area of the window under Folder name.

Word's normal.dot is a hidden file. To view them, you must change the settings under Windows Explorer by taking the following steps:
1. Double-click My Computer
2. Hit Tools®Folder Options and click on the View tab
3. Tick the button that says Show Hidden Files and Folders

More facts on Normal.dot

-Normal.dot stores such settings as AutoText entries, custom toolbars, and macros. You can copy these settings to a new normal.dot or other document or template by using the Organizer.

-Normal.dot is a hidden/system file. Hence, Windows XP users must open My Computer, hit ToolsàFolder Options, View tab, and turn ON showing hidden or system files so that they can see it. You must also customize your search options to search hidden and system files.


Troubleshooting Normal.dot
If you suspect you have a corrupt normal.dot, simply close Word, then do a search on your hard drive for it. Rename it to abnormal.dot. Click here and read Step 1 only to learn how. Relaunch Word and all should be well.

For more information on normal.dot and templates in Word 2003, see the MS Technet Article at http://support.microsoft.com/default.aspx?scid=kb;en-us;826867.

If you are unable to resolve your Word issues by troubleshooting normal.dot, click here for the article that contains all the troubleshooting steps.

Editing Normal.dot
If you want to edit your normal.dot file directly, there's a rule. First try to change the setting you desire to change by using a blank Word document. Some settings, such as Fonts, have a DEFAULT button you can hit. If there isn't one, you'll likely have to open your normal.dot.

Find the location of normal.dot as described above. Close all Word documents to that there are no documents open, and your Word window is gray. Then FileàOpen, and browse to your normal.dot file and open it. Make any changes you like, save it, and close it. Close Word and reopen to be sure all your changes have taken effect.

Tip: Changes to the default view in Word won't "take" unless you also make some other change as well. So type something, delete it, change the view, save and close normal.dot.

Save it!
If you make any changes to your Word settings, or create any macros or anything else that'll change your normal.dot file, then you ought to make a backup of it from time to time. Word must be closed. Use Windows Explorer to create a copy of it. Email it to yourself at home or from home to work, or put it on a floppy (but I hate floppies and they die too easily).
----------- End Text From Link ---------------

Sunday, July 20, 2008

Outlook Command-Line Switches

Issue: Where can I find a list of Outlook command-line switches to control how Outlook starts.


Quick: http://www.howto-outlook.com/howto/commandlineswitches.htm for a nice table or see list of commands below in learnging section.
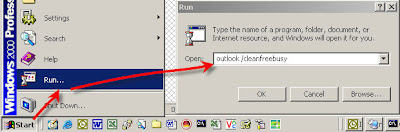


Visual:


Learning:
Outlook switches are useful for things like fixing problems with Outlook Rules, Views, Freebusy information, etc. (Outlook /cleanfreebusy)

----------below is the command list from the above mentioned site----------------
Switch Description
/a Creates an item with the specified file as an attachment.Example:
"C:\Program Files\Microsoft Office\Office11\Outlook.exe" /a "C:\My Documents\labels.doc"If no item type is specified, IPM.Note is assumed. Cannot be used with message classes that aren’t based on Outlook.
/altvba otmfilename Opens the VBA program specified in otmfilename, rather than %appdata%\Microsoft\Outlook\VbaProject.OTM.
/autorun macroname Opens Outlook and immediately runs the macro specified in macroname.
/c messageclass Creates a new item of the specified message class (Outlook forms or any other valid MAPI form).Examples:
/c ipm.activity creates a Journal entry
/c ipm.appointment creates an appointment
/c ipm.contact creates a contact
/c ipm.note creates an e-mail message
/c ipm.stickynote creates a note
/c ipm.task creates a task

/checkclient Prompts for the default manager of e-mail, news, and contacts.
/cleanclientrules Starts Outlook and deletes client-based rules.
/cleandmrecords Deletes the logging records saved when a manager or a delegate declines a meeting.
/cleanfinders Removes Search Folders from the Microsoft Exchange server store.
/cleanfreebusy Clears and regenerates free/busy information. This switch can only be used when you are able to connect to your Microsoft Exchange server.
/cleanprofile Removes invalid profile keys and recreates default registry keys where applicable.
/cleanpst Launches Outlook with a clean Personal Folders file (.pst)
/cleanreminders Clears and regenerates reminders.
/cleanrules Starts Outlook and deletes client- and server-based rules.
/cleanschedplus Deletes all Schedule+ data (free/busy, permissions, and .cal file) from the server and enables the free/busy information from the Outlook Calendar to be used and viewed by all Schedule+ 1.0 users.
/cleanserverrules Starts Outlook and deletes server-based rules.
/cleansniff Deletes duplicate reminder messages.
/cleansubscriptions Deletes the subscription messages and properties for subscription features.
/cleanviews Restores default views. All custom views you created are lost.
/designer Starts Outlook without figuring out if Outlook should be the default client in the first run.
/embedding Opens the specified message file (.msg) as an OLE embedding. Also used without command-line parameters for standard OLE co-create.
/explorer Opens the new window in “explorer” mode (link bar on).
/f msgfilename Opens the specified message file (.msg) or Microsoft Office saved search (.oss).
/firstrun Starts Outlook as if it were run for the first time.
/folder Opens a new window in “folder” mode (Navigation Pane off).
/hol holfilename Opens the specified .hol file.
/ical icsfilename Opens the specified .ics file.
/importprf prffilename Launches Outlook and opens/imports the defined MAPI profile (*.prf). If Outlook is already open, queues the profile to be imported on the next clean launch.
/l olkfilename Opens the specified .olk file.
/launchtraininghelp assetid Opens a Help window with the Help topic specified in assetid.
/m emailname Provides a way for the user to add an e-mail name to the item. Only works in conjunction with the /c command-line parameter.
Example:
Outlook.exe /c ipm.note /m emailname
/nocustomize Starts Outlook without loading outcmd.dat (customized toolbars) and *.fav file.
/noextensions Starts Outlook with extensions turned off, but listed in the Add-In Manager.
/nopollmail Starts Outlook without checking mail at startup.
/nopreview Starts Outlook with the Reading Pane off and removes the option from the View menu.
/p msgfilename Prints the specified message (.msg). Does not work with HTML.
/profile profilename Loads the specified profile. If your profile name contains a space, enclose the profile name in quotation marks (”).
/profiles Opens the Choose Profile dialog box regardless of the Options setting on the Tools menu.
/recycle Starts Outlook using an existing Outlook window, if one exists. Used in combination with /explorer or /folder.
/resetfoldernames Resets default folder names (such as Inbox or Sent Items) to default names in the current Office user interface language.For example, if you first connect to your mailbox Outlook using a Russian user interface, the Russian default folder names cannot be renamed. To change the default folder names to another language such as Japanese or English, you can use this switch to reset the default folder names after changing the user interface language or installing a different language version of Outlook.
/resetfolders Restores missing folders for the default delivery location.
/resetnavpane Clears and regenerates the Navigation Pane for the current profile.
/rpcdiag Opens Outlook and displays the remote procedure call (RPC) connection status dialog.
/s filename Loads the specified shortcuts file (.fav).
/safe Starts Outlook without extensions, Reading Pane, or toolbar customization.
/safe:1 Starts Outlook with the Reading Pane off.
/safe:2 Starts Outlook without checking mail at startup.
/safe:3 Starts Outlook with extensions turned off, but listed in the Add-In Manager.
/safe:4 Starts Outlook without loading Outcmd.dat (customized toolbars) and *.fav file.
/select foldername Starts Outlook and opens the specified folder in a new window. For example, to open Outlook and display the default calendar use: “c:\Program Files\Microsoft Office\Office11\Outlook.exe” /select outlook:calendar
/sniff Starts Outlook and forces a detection of new meeting requests in the Inbox, and then adds them to the calendar.
/t oftfilename Opens the specified .oft file.
/v vcffilename Opens the specified .vcf file.
/vcal vcsfilename Opens the specified .vcs file. /x xnkfilename Opens the specified .xnk file.

Friday, July 18, 2008

Compacting Outlook Mail Files or PSTs

Issue:
PST mail file does not get smaller after deleting messages

Quick:
Right click top folder, Properties, Advanced Button, Compact Now Button.

Visual:


Learning:

When you put an Outlook message into set of personal folders it becomes part of one large file. This message file has the extension .pst and is called a PST file. If you have more then one set of personal folders you will have more then one PST file. Each set of personal folder has a corresponding PST file.

Every time you add a message to your personal folders this file gets bigger. The maximum size for a PST file in Outlook 2000 is 2 GB or 2,000 megabytes (20GB in Outlook 2003). If the PST file is allowed to grow beyond these limits the file may become corrupted and you could possibly lose your mail data.

One day you may notice that the file is getting close to the limit or else it is just too big to deal with anymore, so you delete a bunch of stuff, but you notice that the file does not get any smaller. This is due to the fact that Outlook removes the data from the file, but it leaves an empty spot in the file where the data was removed. Outlook will reuse these empty areas, so you have freed up some room in your PST file, but the actual size of the PST file on the hard disk will not get any smaller. So if you also want to free up some file space on your hard disk you need to remove these empty spots (called white space) in the PST file.

Open Outlook
1. Right click the top-level folder of the PST file
2. Select properties from the popup window
3. Select the Advanced Button
4. Select Compact Now Button
5. Wait for it to complete


Compacting can take anywhere from a few minutes to a few hours, it depends on how much stuff you have deleted. It is best to compact your file as you are leaving for lunch or at the end of the day when you are done with your computer work.

Thursday, July 17, 2008

Power Point Shortcuts

Issue:
Power Point presenteres fumble with mouse and lose there spot during a presentation. Here are some quick keyboard shortcuts that should help presenters to stay in control of the presentation.


Quick:
Start- f5, Next-spacebar, Previous - backspace, Esc-Quit, First-home, Last-end, Jumpto-#, Blackscreen-b


Visual:
Black Screen


Learning:
f5 key - will start the presentation from the beginning.

Spacebar or Enter keys - will advance to the next slide

Esc key - will quit out of the slide show

Home key - will go to the first slide of the presentation

End key - will go to the last slide of the presentation

# Enter key - will go to that slide number. example 12

B key - will cause the screen to toggle between presentation and a black screen. You can right click on the black screen and select pen to do a quick drawing right on the black screen using the mouse, which can be helpful to clarify a point.

Tuesday, July 15, 2008

Laserjet 5550 No Paper Size Alternative

Issue:
When users send documents to the 5550 and specify an unavailable paper size, users could press the green button on the front of the printer and select a tray with a different paper size to use. This stopped working for some reason and here is the fix.


Quick:
In web interface, Settings Tab, Configure Device - System Setup - Tray Behavior - Use another tray prompt - (set this to Enable)


Visual:


Learning:
The HP Laserjet 5500 series has a web interface. Use http://ipofyourdevice/ to connect to the printer.
Click on the settings tab
Click on the "Configure Device" option
Click on the "System Setup" sub-option
Click on the "Tray Behavior" sub-option
In the bottom half of the window you should see the "USE ANOTHER TRAY PROMPT" setting.
In the drop down box select ENABLE.

Users should not be able to select another tray when the specified paper size is not available.

Wednesday, July 9, 2008

Fix Cisco Switch Ports

Issue: One or more ports are not working on your Cisco switch. Ports can get into a disabled state if you plug in a bad cable or something of that sort. Here is how you find the disabled ports and re-enable them:


Quick: use the command sho inter stat err-disabled to find and config t, inter fast PORT#, shutdown, no shutdown.


Visual:


Learning:
1. Logon to the switch
2. >enable (type enable at and the password to gain full access to the switch)
3. >show interfaces status err-disabled (This will show any ports that are disabled)
4. >config t (get into configuration mode)
5. >interface FastEthernet 0/1 (Get to configuration for one of the bad ports. Here you need to put one of the actual disabled port numbers that you found in step 3)
6. >shutdown (This turns that port off)
7. >no shutdown (This turns that port back on)
8. >exit (or CNTR-z to exit out of config-if mode)

Repeat steps 5 through 8 for each port that is disabled.
Exit out

Tuesday, July 8, 2008

Tracking down a computer to a location

Issue:
You have a computer on your network and need to find out where it is physically located.


Quick:
If you have Cisco switches, Telnet to your core switch and "sh arp (pipe symbol) inc IpOfMachine", Get MAC and do "sh mac-address-table address MacAddr", This tells you what port the information came from. If that port goes to another switch repeat the "sh mac-address-table address MacAddr", command on the next switch. Do this till you find the end device port.


Visual:


Learning:
Open a command window in Windows.

Ping the name of the computer to get the ip address:
>ping NameOfLostComputer (make note of the ip address)

In my example the ip address is 172.20.1.201
We have Cisco switches so I logon to our main core switch from a command prompt:

telnet 172.16.5.1 (enter password to logon)
>ping 172.20.1.201 (ping the ip you are looking to update arp table)
Here is the show arp command that I use next:

I see the entry:
Internet 172.20.1.201 1 0013.d435.3169 ARPA Vlan10

Now I need to know where the entry came from, so using the MAC address from the line above I type the command:
>sh mac-address-table address 0013.d435.3169

I see this table displayed:

Mac Address Table
-------------------------------------------
Vlan Mac Address Type Ports
---- ----------- -------- -----
2 0013.d435.3169 DYNAMIC Gi1/0/24


This table tells me that the MAC address of my lost computer was learned from gigabit port 1/0/24, so what is that port connected to? In my case I have a network map that shows how my switches are connected so I can use that, otherwise I would probably have to trace the cable on that port to the next switch.

You could also use the following command to get the name of the next switch
>sh cdp neighbors gi1/0/24
I see:
Device ID Local Intrfce Holdtme Capability Platform Port ID
SJSwitchGig 1/0/24 166 S I WS-C3560-4Gig 0/1

Here you see that gi1/0/24 connects to SJSwitchGig so I telnet to that switch next:
- Note to self to make a table of switch names and ip addresses or add to network map. Probably a good idea to add these switch name to DNS as well so I can telnet directly using the switch names.

>telnet 172.16.5.254 (this is the IP of the next switch according to my map)
I login and look for the MAC address of my lost computer on this switch

>sh mac-address address 0013.d435.3169

And there I see it in the following table:

Mac Address Table
-------------------------------------------
Vlan Mac Address Type Ports
---- ----------- -------- -----
10 0013.d435.3169 STATIC Fa0/37

From this I see that the device is connected to Fast Ethernet port 37. This is an edge switch so from here I know that I connect to the patch panel going to the computer.
This goes to patch panel 18. Here it is handy to have a floor plan of the building with all of the patch port locations on it. From our floor plan map I was able to locate my lost computer.

Open Word document in Word not Internet Explorer

Issue:
You click on a Word .doc file on a website and the file opens in Internet Explorer instead of opening up Microsoft Word. Same may issue with Excel files.

Quick:
In Windows folder options, File Types tab, Select DOC, Click Advanced, uncheck Browse in same window.

Visual:


Learning:
You might think this would be fixed with a setting in IE or in Word but no, the fix for this is in Windows.

Open up a Windows Explorer window. One quick way to do this is to press the Windows key (bottom left of keyboard, next to control) and press the e key at the same time.

1. Click on Tools menu
2. Select Folder Options
3. Select “File Types” Tab
4. Select DOC in the “Registered file types” window.
5. Click on Advanced
6. Uncheck the box “Browse in same window”
7. Click OK to save and exit

Link to Microsoft KB with more information.

Monday, July 7, 2008

Fast command line access to most used windows

Issue:
Saving time using the command-line.

Quick:
Enter command on run line. Commands can often be found by looking at icon target. See list of commands below.


Visual:


Learning:
I often need to restart a service or look at the event logs on a machine. I save a lot of mouse clicks by bringing these windows up from the run line.

Note that some commands you need to put the extension like services.msc for example.

1. Start menu
2. Run
3. Enter one of the following commands in the run box:

cmd (brings up a command window aka dos window)
Services.msc (brings up the services window)
Eventvwr (brings up the event logs)
Msinfo32 (brings up the system information window)
Compmgmt.msc (brings up the computer management window)
regedit – (brings up registry editor)
Perfmon.msc. (brings up Performance monitor)
ncpa.cpl – (brings up NetWork Connections window)
lusrmgr.msc (opens local users manager)
Devmgmt.msc. (opens Device management)
Dfrg.msc. (opens Defragmenter)

These are the ones I use the most but you can get access to other Windows components in the same way.

Here are some others:

If these services are installed.
Dhcpmgmt.msc. DHCP.
Dnsmgmt.msc. DNS.
Dsa.msc. Active Directory users and computers. Dssite.msc. AD sites and services.

Windows Server 2008
ncpa.cpl: Network Connections configuration
desk.cpl: Display settings
appwiz.cpl: Programs And Features applet.
sysdm.cpl: System properties screen
CompMgmtLauncher.exe: Server manager

Prevent a shutdown of a Windows XP system from the Start Menu

Got this off the Techrepublic site.
http://techrepublic.com.com/5218-12843-0.html?authId=wNPoifRjZATohuovWa1uyTnb+sKqGGw7&input=false&reply=true&forumID=102&threadID=261014&messageID=2477991
This is not somthing I usually need to do but I collect this kind of information because it comes in handy at times.

1. Launch the Registry Editor (Regedit.exe).
2. Go to HKEY_CURRENT_USER\ SOFTWARE\Microsoft\Windows\CurrentVersion\Policies\Explorer.
3. Right-click the Explorer subkey and select New DWORD Value.
4. Name the key NoClose and press Enter twice.
5. Type 1 in the Value Data text box and click OK.


To enable the setting, close the Registry Editor and restart your system. Once your system restarts, you will not be able to it shut down by clicking the Shutdown button on the Start menu. This will prevent most users from inadvertently shutting down the computer.

When you do want to shut down your system, just access Task Manager by pressing Ctrl + Alt + Delete, then pull down the Shut Down menu and select the Turn Off command.

Ethernet Wiring and Loop Back

Issue:
How to know what kind of network cable you have or need and how they are wired.

Quick:
See pictures below for wiring diagram.

Visual/Learning:
Working on point to point T1 connection issue today required making a ethernet loopback connector.

The loopback is made by cutting a normal RJ-45 cable and twisting the wires together that go to pins 1 & 4 and 2 & 5.

The link below is a great reference for ethernet cable wiring.
HowToWireLink


This is a pinout image from that site:


Update to post Sept 2008,
If you join Techrepublic you can get to another link with some good information regarding cabeling:
http://blogs.techrepublic.com.com/networking/?p=649&tag=nl.e115


This image is from the Cisco link at the bottom of the post. This is how I identify cables. I hold both ends and look at the order of the cables as explained below.


---key information form the techrepublic link---

While you could put different ends on a UTP cable, typically it will have a RJ45 end with 8 pins.

With a normal Ethernet cable, the wires run straight through, from one end to the other. Straight-through cables are used to connect a PC to a switch


With a crossover cable, the source and destination of the UTP wires are crossed. This allows you to use it to connect a PC to PC, switch to switch, or router to router.


Cisco console and AUX port cabling

There are a few differences between Cisco cabling and other network device cabling. Two things immediately come to mind:

Cisco routers, switches, and firewalls use a special “rolled” cable for console and auxiliary port access.

Cisco offers intelligent serial cabling.


One of the most confusing things to Cisco newcomers is the concept of the console cable. Other SMB and home-networking devices don’t usually have a console port. With those devices, they receive a DHCP IP address and then you can configure them over the network from there. With Cisco devices, there is no IP address on the device, and you must first use the console port and console cable to configure the router, switch, or firewall OOB (out of band).


The Cisco console cable is a special cable. It isn’t wired like an Ethernet cable. However, if you didn’t have a console cable, you could cut off the end of a straight-through Ethernet cable, change the pin out, and recrimp it to make it a console cable.


Below, you can see the pin out of a console cable. The console cable is a “rolled” cable, because if you look at the pins from one end to the other, it is as if the end was rolled over (the order is flipped),


Traditionally Cisco console cables were RJ45-RJ45 and then you would use a RJ45-DB9 adaptor to connect it to your PC’s serial port (COM port). Today, new Cisco devices come with console cables that have a DB9 adaptor integrated/molded to the cable on one end (Figure D). Keep in mind that the data moving across the console cable is serial data (not Ethernet).


More info on these Cisco cables at:http://www.cisco.com/en/US/products/hw/routers/ps332/products_tech_note09186a0080094ce6.shtml

---End of info from Techrepublic link---

Wednesday, July 2, 2008

Using Word for Work Notes - Saves Time & Frustration

When you start a new job there is often a lot of information coming at you in a short period of time. Not only that, there is just a lot to remember period. As an IT person in a small company you need to know procedures and where to go to setup many different services, such as FTP folders, phones, user accounts, email accounts, workstation images, and on and on. Even just managing a few computers at home you may have a need to keep track of certain information.

One simple thing that I do, that has helped tremendously, is to start a notes file. This helps me to keep all the information straight so that I don’t have to keep relearning how to do some infrequently performed task. I use Microsoft Word and a couple of simple tricks to make it easy to find information.

Create Auto Generated Outline
In word you can create an automatic outline of your document to help you navigate to needed information.
Just enter some text for the heading like "Daily Tasks", highlight the text and click on the styles drop down box.


To keep it simple try to use only three or four levels of headings.
Major topics could be things like New Account Creation, Backups and Restores, Software Installs, etc.
Now by clicking on the "Document Map" button (icon has a magnifying glass on it, see figure) you get an outline that automatically updates and changes as you add new headings.
You can click on headings in your outline to go straight to the information you want.

In the figure below you can see part of my notes outline.


Create Links In The Document
Another handy thing is to create links right in the notes document that bring up other documents (Like IP address tracking spreadsheet).
Visually Separate Text
If you have AutoCorrect "borders" turned on, you can create visual text separators on the fly by just typing three characters like dash dash dash and enter (See figure list of text separators).
You can also use Word to highlight important or frequently used information using fonts and colors.

As you can see, with just a little work a notes document like this can make it easy to get at information very quickly.
Just remember to backup the file on a regular basis!